How To Install EcoBatt Insulation

Tools Needed To Install fiberglass Batt Insulation
Safety

PERSONAL PROTECTIVE EQUIPMENT

Recommended PPE: dust mask, loose fitting clothing with long sleeve shirt, safety glasses and gloves are recommended. Watch Jonathon Lang, with the Knauf Academy, review PPE for installing insulation.
 

RE-ENTRY/OCCUPANCY TIMES

It is safe to be in the areas while EcoBatt is being installed as long as eye protection and a dust mask are worn. Recommended PPE is not required to re-enter or to re-occupy the building once EcoBatt has been installed.
 

SITE PREPARATION

Bays and cavities that will be filled with insulation shall be broom cleaned removing all wood waste (sawdust, drilling waste, trash, etc.) and any other debris that is not part of the construction such as loose nails, plastic containers, electrical, plumbing and mechanical scraps, etc. Lumber in contact with insulation shall have a maximum moisture content of ≤ 19% verified with a calibrated moisture meter.
 

CAUTION: FACING MAY BE FLAMMABLE

Unfaced fiberglass insulation is non-combustible. Kraft and foil faced fiberglass batts are combustible and may not be left exposed in occupied spaces. FSK-25 facing is approved for exposed applications.
  • Cover faced insulation with an approved interior finish, such as drywall, as required by local codes.
  • Provide heat source clearance:
    • Install only non-combustible unfaced fiber glass insulation around chimneys, flues and other heat sources.
    • Check with the manufacturer of any heat source in regards to how much clearance is needed around it.

Product

SPECIFICATIONS

This product conforms to the performance requirements of ASTM C665, ASTM E84 and ASTM E136. This product meets the California Referenced Standards Code, Chapter 12-13 Standards for Insulating Material, Part 6, Title 24, C.C.R.


R-VALUE

“R" means resistance to heat flow. The higher the R-Value, the greater the insulating power. To get the marked R-Value, this insulation must be installed properly. Watch this Tips & Tricks video to learn just how important it is to correctly install insulation. Be sure to install EcoBatt insulation with the R-value identification facing the interior.


TIPS TO REMEMBER

  • EcoBatt insulation is compression packaged and should be opened only when ready to install. The insulation will recover and expand to the labeled thickness once the package is opened. Cut the insulation to fit around any and all obstructions.
  • Watch out for nails—especially in attics where roofing nails may protrude through the sheathing.
  • Place walk boards over the joists to make a path.
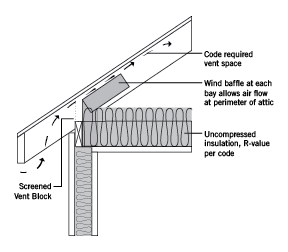
  • Provide insulation vent baffles at eaves to prevent attic insulation from blocking the vents. Follow all applicable codes for proper air-way spacing above baffles and minimum vent area requirements.
  • Fill in all cracks around windows and doors and seal with ECOSEAL™ Plus to create an air-tight seal.
  • Carefully fit the EcoBatt around all obstructions created by electrical, plumbing and other objects. EcoBatt insulation shall be installed and fitted without voids or compressions.
  • Seal and insulate all ductwork to all current jurisdictional codes and regulations. Water lines shall be insulated per current jurisdictional building codes.
  • Hot Objects: Unfaced and flame-rated (FSK) foil faced products do not exceed 25 Flame Spread and 50 Smoke Developed when tested in accordance with ASTM E84 and ASTM E136 for non-combustibility. These products may be used in contact with hot surfaces not to exceed the insulation manufacturer’s stated limits. Other products such as appliances, electrical, plumbing and heating equipment specify combustion safeguards that must be followed per the product manufacturer’s instructions. Follow all governing jurisdictional codes and regulations.
  • Repair all tears in the facing with appropriate tape, duct tape is not an appropriate patch.
  • Watch how to open an EcoBatt Insulation bag.

Air Sealing

AIR SEALING AN EXISTING HOME

Minimizing air infiltration is dependent on the air barrier system and not the insulation type. Like any system it is composed of multiple parts, but these parts can basically be categorized as air barriers and air gap sealants. An air barrier is anything that blocks air from moving—which includes exterior sheathing and interior gypsum board sealed at the edges. For an air barrier system to be effective, air gaps–including all gaps, seams, and penetrations (think plumbing and electrical entries where air could get in) need to be sealed properly.

Knauf recommends using Ecoseal Plus elastomeric sealant and gasket for all penetrations, joints, seams and other air sealing areas required by governing codes, weatherization and other performance and sustainability programs. Application training for ECOSEAL Plus using pressure-applied spray equipment is provided by Knauf Insulation’s training professionals. ECOSEAL Plus may also be applied by hand using a bulk loading caulking gun. Other materials such as highly flexible caulk and foam may be used. Certain restrictions for sealants in contact with hot objects must be followed explicitly to meet approved application procedures.

Attics

ATTICS: WITH EXISTING INSULATION

Check the R-Value of your existing insulation to determine how much additional insulation you’ll need to meet current building and energy codes. Faced fiberglass insulation should have the R-Value printed on the faced surface. For loose fill attic insulation, look for an Attic Card stating the R-Value originally installed. If you cannot determine the R-Value of the existing insulation, estimate the R-Value of batt insulation by measuring the average thickness and multiplying by 3.1. Estimate loose fill insulation by measuring the average thickness and multiplying by 2.3. Install an insulation product with at least the R-Value needed to make up the difference between the existing insulation and the minimum recommended R-Values for your area of the country.

How much insulation will you need? Watch this video to learn how to calculate the number of bags of insulation is needed. And watch this Tips & Tricks video for how to determine the area of the attic. The number of square feet of insulation material is clearly marked on each package. Divide the total attic area by the square footage in a package to determine the number of packages required. Round up to the nearest whole package.

1616055-R-13-K-Batt-(1).jpg
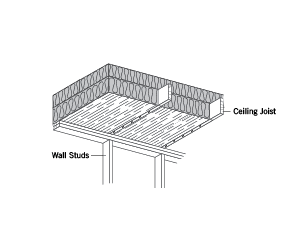
  • Install EcoBatt unfaced batt insulation between the ceiling joists on top of existing insulation when the height of the existing insulation is less than the height of the joist. If the joists are full, place batts over existing insulation at right angles to the ceiling joists. Butt insulation batts snugly against each other.
  • Begin by laying batts at the outer edges of the attic and work toward the middle and the attic access panel. Lay long runs first, using trimmed pieces for short spaces and between framing members.
  • Butt the insulation snugly at all joints. Without compressing the insulation, push it under wiring or ductwork whenever possible. Do not block attic vents.
  • Insulate the top of attic access panels by stapling or gluing insulation directly to the panel equal to the required R-value of the attic insulation.


ATTICS: UNINSULATED

  • Install EcoBatt kraft or unfaced batts in an uninsulated attic. Follow the above directions. Be sure to place faced batts with the vapor retarder down toward the inside of the home.
  • In vented attic applications, vent baffles shall be installed to maintain the minimum jurisdictional code required air gap between the insulation and the underside of the roof deck to prevent insulation from blocking the airway at the eave. The depth (distance from the underside of the roof deck to the upper side of the baffle) of the air gap is determined by governing codes and/or certain weatherization programs and is usually between 1" to 2". Attic vent baffles are available in a variety of styles and material choices, the type of baffle used is up to the installer. Cardboard baffles are the most common and may be used in dryer climates. If using cardboard baffles in a moist or wet climate, wax coated baffles are available. Follow all manufacturers’ installation instructions. Fasteners shall be installed from bottom to top of the baffle fastening area or tab as prescribed by the manufacturer. Insufficient fastening may cause the baffle to fail over time due to wind and/or moisture.
1616055-R-13-K-Batt-(1).jpg1616055-R-13-K-Batt-(1).jpg

Ceilings

CATHEDRAL CEILINGS

Determine the maximum thickness of insulation that can be installed by subtracting 1" from the depth of the ceiling cavity. Select either EcoBatt R-30 (8¼") or R-38 (10¼") High Density insulation. Determine the width of insulation needed by measuring the typical distance between ceiling joists (15" or 23").
1990s-Lanett.jpg

  • Butt insulation firmly against both the top plate of the wall at the bottom and the ridge joist at the top of the cathedral ceiling. Do not push batts completely into the joist cavity. The front face of the batt should be flush with the face of the ceiling joist, leaving a 1" airspace between the batt and the underside of the roof deck. Stapling flanges to the face of the ceiling joists is the best way of maintaining proper batt position for faced products. Do not compress batts or block ventilation.
  • Install kraft-faced batts with the facing toward the inside of the home. For unfaced batts, consult local codes and practices for appropriate vapor retarded selection and positioning.

Walls

EXTERIOR WALLS: WOOD FRAME

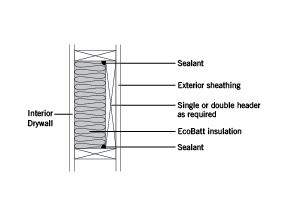
  • Attention to detail is very important. Seal all penetrations in exterior walls with caulk or foam sealant.
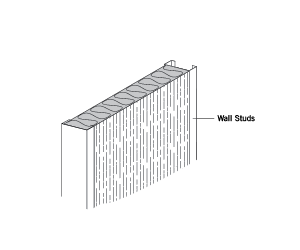
  • Determine the width of insulation needed (15" or 23") by measuring the typical distance between wall studs.
  • When installing kraft or foil-faced batts, place between framing members with the facing toward the warm-in-winter side of the home.
  • When installing unfaced batts, place between framing members. The selection and positioning of an appropriate vapor retarder, if required, should be in accordance with local codes and practices.
  • EcoBatt Staple-Free Batt Insulation is a friction fit batt designed for use in standard 2" x 4" wood framed construction where the stud spacing is no more than 15" on center. For batt products with stapling flanges use 5⁄16" or 3⁄8" staples to fasten stapling flanges or tabs. Maximum spacing for fasteners is 12" and no more than 6" from the top and bottom plates. Fasten each tab to its adjacent stud either to the face or inset stapled. If the face is stapled, overlap successive batt flanges on the previously installed flange.
  • Be sure batts fit snugly against top and bottom wall plates. If desired, the flanges of faced products may be stapled to the face or inside of the wall studs.
  • Without over-compressing, split insulation around wiring, plumbing or ductwork whenever possible. Batts can be partially cut or separated when fitting insulation behind wiring or plumbing fixtures.
  • Place small pieces of insulation behind all outlet boxes. Do not over-compress insulation.
  • For smaller stud cavities, cut staple-free batts ¾" wider than the inside width dimensions of the wall cavity and follow the instructions above.
  • The Installer should make certain that there are no obstructions that could prevent a tight fit and create a gap or void. Repair all tears with Foil-Scrim-Kraft, (FSK) facing tape available in most lumber yards and home improvement stores.
  • Do not leave kraft-faced batts exposed. Kraft faced batts are combustible and must be covered. Cover with an approved finish material (i.e. gypsum board).
  • Cover all insulation and vapor retarders with an approved finish material, (i.e. gypsum board).
favicon-knauf-k.png
 

HEADERS

Exterior wall headers over doors and windows shall be insulated as long as the header is recessed to allow space for insulation. Headers shall be treated as exterior walls with proper air sealing and insulation filling the void. If headers are solid and there is no space for insulation, air sealing shall be applied to the entire perimeter of the header prior to drywall installation.
favicon-knauf-k-(1).pngfavicon-knauf-k-(1).png
 

METAL FRAME

  • Install insulation with specified R-Value. If the R-Value is not specified, measure the depth of the metal stud and select the product with the highest R-Value that completely fills the cavity. Determine the width of insulation needed (usually 16" or 24") by measuring the typical distance between metal framing.
  • Install EcoBatt kraft, foil or FSK-foil batts between framing members with facing toward the conditioned space.
  • Note: Friction-fit one side of the batt into the metal C-channel and butt the other edge against the metal stud.

Note: In warm climates where high humidity prevails, faced products may be installed toward the exterior of the structure and away from the air- conditioned space in accordance with local codes and practices.

  • Install insulation to cover the full height of the wall including spandrel areas. Use unfaced insulation or FSK-foil faced insulation in areas, which will not be directly covered by an approved finish material (i.e. gypsum board).
  • Attention to detail is very important. Seal all penetrations in exterior walls with insulation caulk or foam sealants.
favicon-knauf-k-(1).png 
 

KNEE WALLS

Knee walls that separate vented or unconditioned attic space from conditioned living space are to be treated as exterior walls with the addition of installing an air barrier using rigid material (drywall, plywood, Oriented Strand Board or rigid insulation) on the attic side of the knee wall. The entire knee wall must be air sealed, insulated and sheathed on both sides of the wall.

favicon-knauf-k-(1).png 
 

BASEMENT WALLS

Install furring strips or framing that will accommodate the thickness of insulation you are installing.

  • Install EcoBatt kraft or unfaced batt insulation between framing members. Apply kraft-faced insulation with kraft facing toward the inside of the home.
  • If desired, the flanges of faced products may be stapled to the face or inset stapled on the framing.
  • Friction-fit unfaced insulation between framing.
  • For totally above grade walls, insulate per the instructions provided above for Exterior Walls.
  • For partially or totally below grade walls, no vapor retarder is required. Therefore, unfaced batts should be used.
  • Cover either application with an approved finish material (i.e. gypsum board).
favicon-knauf-k-(1).png 

BAND JOISTS/RIM JOISTS

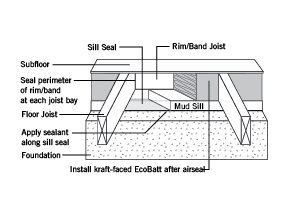
Band and rim joists are essentially short exterior walls. These shall be treated the same as any exterior wall assembly. Band and Rim joists must be air sealed, insulated and require an air barrier. If the band or rim joists are in an enclosed floor system, i.e., a floor assembly that is fully enclosed such as a second floor that separates the first and second conditioned spaces, air sealing is essential though an air barrier is not necessary. All unenclosed floor systems require and air barrier, i.e. an unfinished floor assembly over a crawl space or an unconditioned, unfinished basement.
favicon-knauf-k-(1).pngfavicon-knauf-k-(1).png

Floors

Over Unheated Crawl Spaces, Garages, Overhangs and Cantilevers

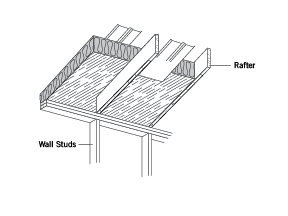
Determine the maximum R-Value of insulation that can be installed by measuring the depth of floor framing members. Select either R-38 (12"), R-38HD (10¼), R-30 (10"), R-30 (9½"), R-30HD (8½") R-22 (6½"), R-19 (6¼"), or R-13 (3½"). Determine the width of the insulation you’ll need by measuring the typical distance between floor joists.

  • Fit EcoBatt kraft-faced batts between floor framing joists with the facing toward the warm-in-winter side. Support with wire insulation supports, criss-crossed rust-proof wire, or chicken wire.
  • Position insulation to protect water lines and HVAC duct systems keeping them between the insulation and the conditioned portion of the home.
  • When installing unfaced EcoBatt over unconditioned, vented crawl spaces, install batts that are properly sized for friction fit between joist spacing and type of joist, i.e., manufactured joists, dimensional lumber. Secure Knauf Insulation EcoBatt with plastic or other twine that is rot and rust resistant and not susceptible to moisture damage. Underfloor insulation support systems shall be installed so the insulation remains in full contact with the sub-floor, flat and in place for the life of the residence. Supports may be installed using wood lath, twine, wire, or other suitable material. Insulation supports shall be installed with spacing no more than 24" on center and fastened using a pneumatic stapler. Foundation vents shall be placed so the top of the vent is below the lower surface of the floor insulation. When foundation vents are not placed where the top of the vent is below the lower surface of the floor insulation, a permanently attached baffle shall be installed at an angle of 30° from horizontal to divert air flow below the lower surface of the floor insulation.
  • In crawl spaces, cover the ground with a 6 mil polyethylene film to serve as a barrier to ground moisture. Provide adequate ventilation to the outside.
  • Learn how to avoid air leakage in a garage by watching this Tips & Tricks video.
favicon-knauf-k.pngfavicon-knauf-k.png

Crawl Space

UNVENTED CRAWL SPACE

  • Friction fit slightly oversized sections of EcoBatt batts in each joist and over sill plates.
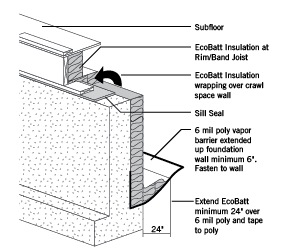
  • Crawl space wall insulation shall be permanently fastened to the interior of the foundation wall. Insulation shall extend downward from the Rim/Band Joist and continue over the top of the foundation wall to the finished grade of the crawl space and extend horizontally out from the foundation wall for no less than 24". Exposed earth in unvented crawl space foundations shall be covered with a Class I vapor retarder. 6 mil polyethylene is an acceptable material. All joints of the vapor retarder shall overlap by six inches and be sealed or taped. The edges of the vapor retarder shall extend not less than six inches up the foundation wall behind the insulation. Wall insulation shall cover the vapor retarder on the foundation wall with the bottom edge of the insulation taped to the vapor barrier. Insulation shall be placed over the vapor barrier ground cover and taped or sealed at the edges. Secure the insulation by driving galvanized nails and washers through the insulation into the sill plate. You can also nail wood lathes into the sill plate every 18", compressing the insulation between the lathe and sill plate.
  • Be sure to cover the ground with 6 mil polyethylene film to serve as a barrier to ground moisture.
favicon-knauf-k.png

Sound Control

WOOD FRAME (Residential and Multi-family Construction)

Identify interior walls, floors, or ceilings which border areas that need to be isolated from other areas of the structure. Determine the width of insulation needed by measuring the typical distance between framing in each of these areas (usually 15" or 23").

  • Install EcoBatt® 3½" (R-11) unfaced or kraft-faced insulation between all framing members bordering this area. Friction-fit unfaced insulation or install kraft-faced batts. Faced batts may be stapled to the studs, if desired.
  • Cover faced insulation with an approved finish material (i.e. gypsum board).


METAL FRAME

Identify interior walls or ceilings which border rooms or common areas that need be isolated from other rooms or common areas.


PARTITION WALLS

  • Friction fit one side of 3½" (R-11) unfaced EcoBatt insulation into the metal C-channel and butt the other side against the metal stud. Install insulation to cover the full height of the wall.
  • Cover with an approved finish material (i.e. gypsum board).


ACOUSTICAL CEILINGS

  • Position either 3½" or 6¼" unfaced EcoBatt batts over the top of acoustical lay-in ceiling panels or metal pan ceilings. EcoBatt unfaced batts should only be used in conjunction with fire-rated ceiling products.

How to Choose the Right Insulation
Fiberglass Insulation
The smart choice to make spaces more comfortable and energy efficient.
Learn More
R-Value
The ability to resist heat flow — insulation's thermal resistance.
Learn More
Thermal Properties
Ability to enhance a thermal enclosure for comfort and efficiency.
Learn More
Insulating For Sound
Sound absorption characteristics, helping reduce noise transmission.
Learn More
Need More Product Support?
Reach out to our technical support team for product specs, installation guidance and more.
Contact Tech Support